When RVs have to go...™
When and How to sanitize your RV water system

This article will cover the Why, When and How to sanitize your RV water system for the DIY (do it yourself) RVer.

Why is Sanitizing Your RV Water System Necessary

Insuring clean, safe drinking water in your recreation vehicle is important to your health and requires sanitizing your fresh water system. Proper care and maintenance is a must.

If your RV has been sitting in storage, or has not been used for a while, the fresh water storage tank, hot water tank and water lines are a great place for bacteria to grow, and you don't want that to happen. In order to remove these problems from your RV, you should sanitize your water system.

When Should you Sanitize Your RV Water System

  • Do you notice a stale odor when using your water from the fresh water system? It usually occurs when water was left in the system for quite some time. It is time to sanitize the entire water system.
  • Has your RV been sitting for a month or more and the RV water system has not been used? It is time to sanitize the entire water system.
  • Have you filled your water tank then been informed that there is a boil water advisory? It is time to sanitize the entire water system.
  • Do you have a problem with algae or slime in your tank? It is time to sanitize the entire water system.
  • If you do not drink water out of your fresh water tank, you might think that you will never have to sanitize, however, if you use water from your fresh water tank for any purpose? It is time to sanitize the entire water system.
  • You must remember that filters will remove contaminates such as sand and rust and will improve taste and odor but a filter is not a purifier and will not kill bacteria and other microorganisms. It is time to sanitize the entire water system.

How do you Sanitize Your RV Water System

The generally accepted method of sanitizing your RV's fresh water system as outlined below involves filling the fresh water system with a solution of household bleach and running the solution through the entire RV water system. Then letting it stand for at least four hours. Finally, flush the system to remove the bleach taste and smell.

This procedure is one you'll find in most books about RVing but be sure to read on to find out what we do.
  1. Read through these sanitize RV water system steps before you begin!
  2. Some things to consider before you start.
  3. Time, you need at least 5 to 10 hours time span to complete the task.
  4. Do you have internal and or external water filters? Remove the water filters while sanitizing the water system. If so, you should change the filters after you have finished sanitizing the RV system.
  5. Do you have a hot water tank? If you do, now might be a good time to flush out your hot water tank.
  6. Drain all of the water out of the water system, this includes hot water tank, fresh water tank, and the water lines and then close all the drains valves. You do not want to start this process with water that is questionable or of unknown quality in your RV water system.
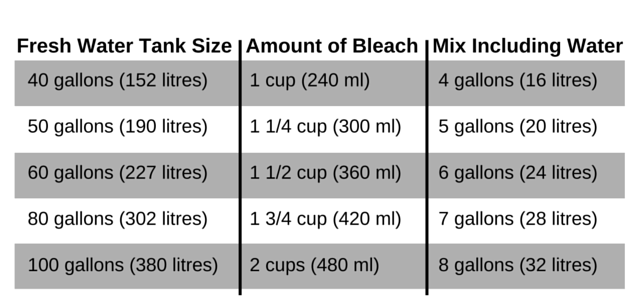
  7. Determine the size of your RV water system, the fresh water tank plus the hot water tank and 2 to 3 gallons for water lines depending on the size of your recreation vehicle.
  8. Chlorine as a purification and disinfection, chlorine is an important chemical for water purification (such as water treatment plants), in disinfectants, and in bleach. Chlorine in water is more than three times as effective as a disinfectant against Escherichia coli than an equivalent concentration of bromine, and is more than six times more effective than an equivalent concentration of iodine.
  9. Prepare a 5% sodium-hypochloric solution using chlorine bleach (non-scented and non-gel) and water.
  10. US Public Health Service approves disinfection with 50 ppm residual chlorine.
chlorine chart for sanitizing
  1. Add bleach mixture to the water tank - Never pour straight bleach into the RV fresh water tank!
  2. If you have a bypass for your hot water tank, make sure that is set for normal use so that the bleached mixture will be pumped through the hot water tank.
  3. Top up the fresh water tank with water.
  4. Run the chlorinated water through all lines (hot and cold one at a time) for one or two minutes, you should be able to smell the chlorine.
  5. Top up the fresh water tank with water again.
  6. Let it sit for 4 hours minimum, overnight is better. The most important thing is to wait the appropriate amount of time for the tank to be properly sanitized.
    Note: Double the bleach is not half the time
  7. Drain and rinse the water tank and water lines several times with fresh water.
  8. The water should now be safe to drink but if the chlorine odor is too strong you can add a mixture of 1/2 cup of baking soda and a gallon of water to the fresh water tank, repeat the fresh water flush.

Happy RVing!

TPT - Toilet Paper Test

Learn how to do a toilet paper test for a 'RV Friendly' brand of TP.

Dumping Your Holding Tanks

Learn the simple steps to dump your holding tanks successfully.
Share on Facebook  Tweeter Tweet  Share on LinkedIn  Pinterest Pin it  Post to Tumblr
When RVs have to go...™

National Day Calendar

✔ Mark your calendar,
June 7 is
National RV Day,
Let's go RVing!

More information...

Dump Station Closed Notice

Dump Station Closed

Mobil Gas Station
in Yuma, AZ

Closed Dump Stations RSS Feed

[Valid RSS]

Dump Station Types

The type of recreational vehicle dump stations you will find on Sanidumps.com include: private, public, RV park, non-park, municipal, truck stop, rest stop, campground, camping, resort, commercial, pay, donation, waste disposal, and free.

It is important to dispose of human waste properly when RVing. The RV dump station, dump point, or sanidump station you choose to empty your gray and black water holding tanks is up to you; we're hoping that you will choose an approved dump station site that's green and environmentally friendly, using an environmentally sound method.

Know Where To Dump Your Tanks

Do you need to know where to dump your holding tanks when your RV is on the road? Now you can know where the RV dump Stations are while traveling with a e-book. More information about the RV Dump Station location e-book.

Disclaimer:

Although efforts are made to make sure of the accuracy of the information presented, Sanidumps.com shall have neither liability nor responsibility to any person or entity with respect to any loss or damage caused, or alleged to be caused, directly or indirectly by the information contained here.

Sanidumps.com is not affiliated in any way with any place/location listed on this site. Fees are subject to change; availability and prices can and do change.

We thank all the RVers that have contributed information :-)

The Sanidumps.com Team


Facebook  Twitter  Pinterest  RSS

Serving the RV community for over 18 years
Sanidumps.com - When RVs have to go...™
© 2006 - 2024 Sanidumps.com - All rights reserved.

Copyright Notice:

The content contained on this website may be used for personal reference only and may not be reproduced in any form without prior written consent permission from Sanidumps.com

Sanidumps.com

Australia, Canada, Mexico, New Zealand, United States & more...